Wednesday, May 28, 2008
A map to help you eat local
I stumbled across this map, which shows by state and month, what ingredients are in season. Very spiffy graphics. When checking for Wisconsin, it does become apparent that it can be challenging to eat local around here. For November through May, the growing season is listed as dormant and you would have to go for stored items, such as apples and potatoes. This does put our challenges of hosting a local meal in March into perspective.
Friday, May 2, 2008
Recipe: Spent grain bread
Here's the recipe we use for our Spent Grain Bread. It is adapted from Peter Reinhart's Whole Grain Breads (if you like whole grain bread, this book is great!). It takes two days, but it is really simple stuff on both days. It uses 'spent grain' which is the grains that are left over from brewing beer. In the homebrewing process we use, these grains are steeped for about an hour in 68℃ / 155℉ water. Normally they would be discarded (we'd composted them before we started baking them). The taste, texture, and color of the bread will vary considerably with the type of grain used for the beer (big difference between a stout and pale ale grains). If you're not a homebrewer try asking your friends - I'm often surprised at how many people are homebrewers - youought to find someone who knows someone who brews. You could also ask a local microbrewery.
This recipe makes two loaves, or about two dozen rolls.
Day 1:
About 20 minutes of work.
Soaker
The soaker works to hydrate the grains in the whole wheat by mixing it with water and salt and let it sit overnight. This makes the grain softer but also enhances flavor and makes the bread a little sweeter (check Reinhart's book for the whole explanation).
Ingredients:
Biga
Reinhart uses the term 'Biga' for an overnight starter that uses a small amount of yeast and also soaks the whole wheat flour to increase flavor and acidity.
Ingredients:
Let the dough rest for five minutes, then knead again with wet hands for about one minutes. This time, the dough will be easier to work with, although it will still be tacky. Cover and refrigerate for at least 8 hours.
Day 2:
About 2 hours de-chill, then 20 minutes mixing followed by 2-3 hours fermentation. Baking takes 45-60 minutes.
Now we make the bread. Remove the Biga from the refrigerator about two hours before starting to mix the final dough.
Ingredients:
Knead the dough again for about a minute. The dough should feel soft, supple, and very tacky. Place the dough into a lightly oiled bowl, covering it in oil on all sides. Cover the bowl and let the dough rise at room temperature for 45 to 60 minutes.
Form the dough into two loaves or smaller rolls. Cover loosely and let rise an additional 45 to 60 minutes.
Preheat oven to 425℉/218℃. Add a steam pan to the oven and a hearth stone. When you put the bread into the oven, pour a cup of water into the steam pan and spray several times with a water mister inside the oven (not on the bread). The purpose is to create steam that will produce a crusty crumb on the bread. Lower the temperature to 350℉/ 177℃and bake for 20 minutes. Rotate the bread 180°and bake another 20-30 minutes until the bread is done (thump the bottom to hear if it sounds hollow).
Cool on a wire rack and enjoy! Leave a comment if you try it out and let us know how it went.
This recipe makes two loaves, or about two dozen rolls.
Day 1:
About 20 minutes of work.
Soaker
The soaker works to hydrate the grains in the whole wheat by mixing it with water and salt and let it sit overnight. This makes the grain softer but also enhances flavor and makes the bread a little sweeter (check Reinhart's book for the whole explanation).
Ingredients:
- 454 g / 1 lb whole wheat flour
- 1 tsp (8 g) salt
- 1½ cups water
Biga
Reinhart uses the term 'Biga' for an overnight starter that uses a small amount of yeast and also soaks the whole wheat flour to increase flavor and acidity.
Ingredients:
- 454 g / 1 lb whole wheat flour
- 5/8 tsp active dry yeast (1/2 tsp instant dry yeast)
- 1½ cups warm water
Let the dough rest for five minutes, then knead again with wet hands for about one minutes. This time, the dough will be easier to work with, although it will still be tacky. Cover and refrigerate for at least 8 hours.
Day 2:
About 2 hours de-chill, then 20 minutes mixing followed by 2-3 hours fermentation. Baking takes 45-60 minutes.
Now we make the bread. Remove the Biga from the refrigerator about two hours before starting to mix the final dough.
Ingredients:
- Soaker
- Biga
- 225 g spent grain
- 113 g whole wheat flour
- 2¼ tsp (10 g) salt
- 2 Tbsp + 1 tsp active dry yeast (1½ Tbsp instand dry yeast)
- 85 g (4½ Tbsp) honey
- 2 Tbsp vegetable oil (optional)
- Extra whole wheat flour for adjustments
Knead the dough again for about a minute. The dough should feel soft, supple, and very tacky. Place the dough into a lightly oiled bowl, covering it in oil on all sides. Cover the bowl and let the dough rise at room temperature for 45 to 60 minutes.
Form the dough into two loaves or smaller rolls. Cover loosely and let rise an additional 45 to 60 minutes.
Preheat oven to 425℉/218℃. Add a steam pan to the oven and a hearth stone. When you put the bread into the oven, pour a cup of water into the steam pan and spray several times with a water mister inside the oven (not on the bread). The purpose is to create steam that will produce a crusty crumb on the bread. Lower the temperature to 350℉/ 177℃and bake for 20 minutes. Rotate the bread 180°and bake another 20-30 minutes until the bread is done (thump the bottom to hear if it sounds hollow).
Cool on a wire rack and enjoy! Leave a comment if you try it out and let us know how it went.
Friday, March 28, 2008
Earth Hour and Local Dinner coming up
Earth Hour 2008 is tomorrow evening at 8:00pm (local time no matter where you are in the world). We just came across a Time article that takes on the criticism that turning off the lights for an hour doesn't really do much. The point is that it's a symbolic act, and symbolism matters hugely in politics, and climate change is first and foremost a political problem.
Here, we will host a dinner of mostly local food - it's really hard to get truly local food in March in Wisconsin - we'll substitute organic food for most of what we couldn't get locally. We'll have about 18 people at the house enjoying good food, wine, and company (hopefully!).
What are you doing for earth hour?
Sunday, February 24, 2008
Big Baking Day!
 We were pretty busy this weekend doing some baking - see most of the results in the picture. Clockwise from top left: Spent grain batards, spent grain rolls, farmhouse white, pumpernickel, and baguettes. The farmhouse white (with white whole wheat) is fast becoming our staple sandwich bread, and the pumpernickel is the staple Danish bread, that most Danes are unable to survive without for prolonged periods.
In addition, we also did the usual Friday night pizza with the homemade crusts, and Sunday Kim baked an additional three loaves of farmhouse white.
The trickiest part on Saturday was timing all the breads so that the oven would be available when things needed to go in. Of course, each bread requires a different temperature and time in the oven...
This table shows how we planned it out:
| Bread | Prep time (mix, knead, raise etc) | Baking time | Start time | Oven time |
| Pumpernickel | 3 hours 30 min | 1 hr 15 min @ 350F | 11:30 am | 3:00 pm |
| Farm house white | 3 hours | 35 min @ 375F | 10:00 am | 1:00 pm |
| Spent grain | 2 hrs 15 min | 20 min @ 425/350F | 9:30 am | 11:45 am |
| Baguettes | 4 hours 30 min | 20 min @ 475 | 9:30 am | 2:00 pm |
This worked out fine for the most part, except the baguettes didn't rise as expected and needed a bit more time, so they were ready at the same time as the pumpernickel loaves. We resolved the conflict by sticking the pumpernickel in the garage (close to freezing temps) until the baguettes were done in the oven.
Tuesday, February 19, 2008
Food Storage/Preservation - 2007
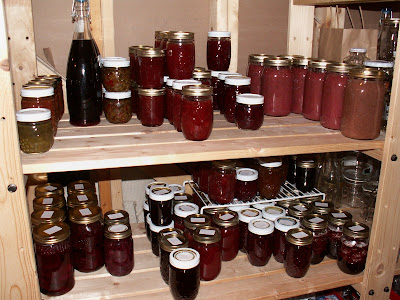
In past years, we've had great trouble storing our veggies after harvesting them. However, after last season through dumb luck or trial and error, we finally were able to store things for extended periods of times. We're still eating onions, carrots, and leeks harvested last year. And of course we also have a lot of jam that were made throughout the fall. Here's a list of everything we grew, how they did, what we did to store them, and how some of them performed after being stored. Looking at the list, we just realized we had a pretty busy year - and a pretty good crop of most things. Not bad for a city lot...
Apples
- Our trees are still quite young, and were ravaged by deer early on, so this was the first year that we got any apples, and we only harvested about four of them - a couple of McIntosh and a couple Braeburn(?). All of them were good - though a bit small. There were not enough to store.
Pears
- This was the first year that we got any pears, and we only harvested 1 (damn deer!) - not enough to store.
Plums
- There were no plums this year. Apparently, this is a common problem with plums. the tree grew well, though, and didn't really get eaten too much by the deer.
Berries
- Strawberries: We had a great harvest, though not quite enough for jam, so we picked about 24 pounds at a local produce farm (Allen's Allenville Produce). Berries were cleaned, rinsed, then frozen.
- Raspberries: Starting to come, though we had to pick additional berries up in Sherwood to support jam production. Berries were rinsed, then frozen once they were picked. We would just keep a bag in the freezer and add berries as we picked them from the garden.
- Blackberries: Harvested enough berries to make a few jars of jam. Berries were rinsed, then frozen.
- Blueberries: No berries were harvested - need to cage them from the rabbits and deer, and provide more sulfur. Probably should re-do that bed to better support both the rhododendrons and blueberries.
- Rhubarb: all the plants are producing nicely. We had ample rhubarb to make strawberry-rhubarb jam, as well as several jars of rhubarb compote. Rhubarb was cleaned, diced, then frozen.
Beets
- Beets were harvested and cleaned.
- We had some trouble with an animal (perhaps rabbits) eating the leaves and tops of the beets that were above-ground.
- 90% of the beets were then pickled the same weekend that they were harvested.
- The other 10% were stored in the Dutch oven pan - kept cool and dark - and eaten for dinners. The beets kept well this way for a couple of weeks. They could probably also be stored outside in the stairwell.
Carrots, Leeks, Potatoes
- Oct 14, 2007: Filled a large wheeled Rubbermaid container with peat moss and moistened with water (the six-year-old really got a kick out of the 'treasure chest', as she called it). This was stored in the garage stairwell down to the basement (constant temperature and fairly dark).
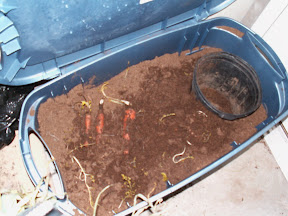
- Carrots: Removed the tops and buried them in the damp peat moss.
- Some of the carrots in the peat moss started to sprout again early on.
- The late harvested carrots had their tops removed and were dumped into a large plastic tub and covered with leeks. Nothing else was done to them, and no peat moss was used. They were moved to the bottom of the stairwell after we had some significant freezing temps in the garage.
- Carrots were still good on Feb 19, 2008.
- Leeks: Removed/trimmed half the roots and leaves
- Layered some on top of the peat moss
- Placed some in a shallow bucket in the peat moss
- Buried some in the peat moss - some of these started to grow again early on.
- The last harvested were dumped into a large plastic tub bucket on top of carrots with a piece of burlap loosely thrown on top to nominally keep moisture in the tub. There was no peat moss in the tub, and nothing special was done.
- Leeks were still good on Feb 19, 2008, but we're seeing quite dry leaves on the outer layers.
- Potatoes: stored them in a bucket that was nestled in the peat moss, and a thin layer of peat moss covered the potatoes.
- We finished the potatoes in Jan, 2008. They were still good. We're planning more potatoes for this year.
Celeriac
- No celeriac were harvested this year.
Chili Peppers
- Strung them and hung them to dry over the freezer in the basement. Within 2 weeks started to have problems with mildew.
- Oct 14, 2007: cleaned chilis, cut in half lengthwise, removed seeds and dried them in the oven on lowest setting for about 2 hours. The chilis were rubbery when they came out. Allowed to cool off and then stored them in a Ziploc bag in the cabinet.
Green Peppers
- These were eaten as soon as they were harvested.
Garlic
- These were cured in the sun in the screened in porch and eaten within a month.
Onions
- Onions were cured in the screened-in porch in Aug/Sep 2007.
- After curing they were sorted by type, and stored in the two small folding boxes in the gardening area of the basement.
- Onions were eaten in the following order: white, red, yellow.
- Feb 19, 2008: We still have a couple of red onions left. The yellow onions are still good, though we are starting to find ones that are going mushy or sprouting. Throughout the winter we have periodically sorted through the onions and removed any mushy ones.
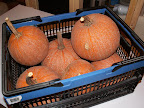
Pumpkins
- Pumpkins were harvested in October and cured in the screened in porch.
- Whole pumpkins were then stored in a folding box in the basement.
- Feb 19, 2008: Seven pie pumpkins remain and appear to still be good.
Salad
- Salad was eaten shortly after harvest. Need to plant more at 2-week intervals throughout the summer.
Spring Onion
- These were eaten shortly after harvest.
Tomatoes
- Ripe tomatoes were washed, dried, and any black spots cut off before being sliced into quarters and stored in Ziploc bags in the freezer. Like the raspberries, this was done continuously as we were unable to keep up with eating them fresh.
Zucchini
- Mature zucchini were cut from the vine and successfully stored in a plastic bag in the refrigerator for up to two weeks (and some were given away to friends and coworkers - and then we gave away some more - maybe we'll go down from two to one plant next year).
Finished Products
As we were harvesting we used the fresh produce to prepare finished meals and breads that were then frozen or eaten that day. Most items were doubled so that we had a meal that day, and one to put in the freezer.
- Potato Leek Soup
- Gullasch Soup
- Carrot Salad
- Squash Rolls - a whole grain dinner roll
- Carrot Rolls - a whole grain dinner roll
- Zucchini Bread - a sweet cake-like bread
- Applesauce Muffins - made with apples from a colleague
- Leek Quiche
- Lasagna with Shredded Zucchini
- Turkey Soup - cooked from the leftover turkey carcass
- Veggie Soup Mix - combination of blanched leek, carrot, and celeriac (when available) for use in soups throughout the winter
Monday, February 18, 2008
Snow, Snow, and More Snow!
 The last two days we have received 10" of snow (following a half inch of ice), bringing us within striking distance of the season record for snowfall. The snow is now so deep that anytime the wind blows (seems like all the time!) - the valleys we used to call sidewalks and the front walk get completely filled with snow above the intake for the snow blower. Not too bad the last couple days since it's been very soft and loose snow that just falls down behind the snowblower and can be cleared on the next pass. I've cleared snow four times over the last two days - and I'll probably have to be back out tomorrow morning.
All this snow ought to give good moisture for the garden - even thought it's pretty hard to imagine doing any gardening right now. It'll probably be April before the snow melts at this rate.
Well, we've ordered the seeds (more on this in a later post), so at least we're thinking about it...
Stay warm!

Wednesday, February 13, 2008
Are you Ready for Earth Hour 2008?

We wrote earlier about Lights Out America. The movement to turn off all non-essential lights at 8 pm on March 29, has changed its name to Earth Hour, and is a very global event modeled on the successful Sydney event last year.
Spread the word today!

Tuesday, February 12, 2008
Garbage-reducing Partnership
 One of Kim's colleagues is also an artist who melts down beer and wine bottles (see an example of her work in the picture). The bottles are great decorations - ours is in the kitchen (of course!).
We've had the bottle for a couple of years and enjoyed it, but recently we expanded the collaboration, since she had some dark beer that she didn't like, but she wanted the bottles for decorations. So, she asked us if we would be willing to drink the beer - are you kidding? Free beer? Of course we said yes. She will take any wine bottle we drink, so now we won't need to recycle wine bottles any more.
Partnerships are great!
Monday, February 11, 2008
Trashblogging ... no litterally!
There's a lot of trash talk in the blogosphere, but I didn't realize until the other day that there's also a ton (literally too!) of literal trash blogging going on - blogs that are entirely devoted to the topic of trash! I first found out about this in a CNet News article on bloggers saving, weighing, and writing about their trash. It seemed pretty extreme - one guy saved all his trash for a year! And then blogged about it at Save Your Trash. And we were beginning to think we were a bit extreme... Then again, there's a long way from Wisconsin to California...
Then there's Beth over at Fake Plastic Fish, who goes to great length eliminating plastic trash - even recyclables - and then keeps whatever she does generate. She keeps a running tally of all plastic items she's discarded (868 items weighing 13.5lb since June 2007). She's very similar to EnviroWoman - a self declared WhackedOutEcoFreak who also keeps all plastic and loudly declares not to use any plastic (although it's hard).
The CNet piece also covers 'Compactors' who never buy anything new...
Well, we don't keep our trash in bins in the living room, but most of the advice contained in these blogs are relevant and sensible. For instance, Save Your Trash had a nice summary post with good advice on things we've blogged about as well: Use a reusable coffee mug and bring your own grocery bags. He also has good advice we haven't talked about here: Use a reusable plastic bottle and bring your own container to restaurants to bring home leftovers.
Even though some of those bloggers are a bit extreme, the point they're making is poignant: We produce an awful lot of trash in this country (and throwing it away, doesn't really make it 'go away' - it's just moved somewhere else). So anything we can do to reduce this problem should be well worth it.
Tuesday, February 5, 2008
Going Green - for the masses
We just discovered the National Geographic Green Guide - a magazine "Written for general consumers, not for enviromaniacs". In addition to the $15/4 issue magazine, they also have a great web site chock full of buying guides, articles, tips, tricks, even a half dozen blogs.
Haven't explored it entirely yet, but everything seems to be very accessible and down to earth. Heck, any web site that talks about brewing beer as an environmental solution, should be commended!
Haven't explored it entirely yet, but everything seems to be very accessible and down to earth. Heck, any web site that talks about brewing beer as an environmental solution, should be commended!
Wednesday, January 16, 2008
Status on Our Sustainable Efforts
Recently, someone at corporate at Kim's work questioned whether consumers would be willing to spend extra money on things they didn't perceive to have a direct health benefit (i.e. spending money on carbon credits to avoid something bad perhaps happening in a number of years. Here's Kim's response, which nicely sums up a lot of our efforts over the past couple of years (except for food, which of course is another major focus for us):
Thanks for bringing this to the attention of those in Dallas that people really are willing to pay more for items they believe to be sustainable. My family is currently working to increase our use of sustainable practices and decrease our carbon footprint.
With this in mind, over the last three years we have:
Future plans:
- Built a new house which was pre-built in a warehouse. By pre-building sections of the house in a warehouse less wood is consumed and wasted – everything can be pre-measured and the small sections of the 2x6s that are left over are used elsewhere in the construction. We paid a bit more for this, but felt that by doing so we reduced the impact on our forests. The house is two stories with a finished basement, and overall living space is 3500 square feet.
- All ceiling lighting (not floor lamps – yet!) utilizes CFLs.
- Outdoor security lighting is tied to a solar panel and timer to turn on and off throughout the year.
- About 6 months ago we started purchasing green energy form our local energy company. We purchase enough green energy to off-set all our electric needs.
- Since we are not yet ready to buy a hybrid car (which our next one will most certainly be), we are purchasing carbon credits to off-set the gas that we purchase for both vehicles each year.
- We have invested in prairie plants and built rain gardens in our yard to keep the run off form our roof on our property and out of the storm sewers. The upfront cost of a rain or prairie garden is a bit higher than for your traditional garden plants, but well worth the investment.
- We plan to add additional rain gardens as well as rain barrels to our city lot to decrease the amount of city water we need to pull from the lakes and water table.
- We are currently looking into solar energy panels and what it would cost to install them, as well as what our ROI would be.
- As an alternative to solar energy, we are looking into solar water heating as well. The up front costs are lower and the ROI is better, so this may be our entry point into the world of solar. Before we can install any solar, however, we need to get plans drawn up which need to go before a review committee for our neighborhood, and we need to get he covenants changed to allow solar panels. Neither of which will be easy, however we feel it will be well worth the battle.
- I recently found out about “paper plates” and “plastic-ware” that is biodegradable and (I believe) corn based. Instead of throwing it in the garbage after your July 4 picnic, you can just throw everything into the compost bin. We will definitely be using them the next time we plan a picnic gathering!
Sunday, January 13, 2008
Fiber-rich Pancakes

We like pancakes and bacon on the weekend, but it's often a fatty and unhealthy breakfast. So, I've been trying to come up with a healthier version. It's still quite light, despite being full of grains and fiber. They're also very filling - two will usually be enough per person.
Ingredients:
- 3 eggs
- 2½ cups white flour
- ½ cup wheat bran
- ½ cup oats
- ½ cup flaxseed meal
- 2½ cups milk
- 3 Tbsp sugar
- 3 Tbsp baking powder
- ½ tsp salt
- 1 tsp cinnamon (if desired)
- Beat eggs with hand beater in large bowl until fluffy. This takes 3-4 minutes.
- Beat in remaining ingredients just until smooth
- Let batter sit for about 5 minutes to let the grains absorb the liquid. If it's still too liquid, add water 1-2 Tbsp at a time until it's right.
- Fry pancakes on hot griddle - about 4 minutes on each side.
- Serve with butter, syrup and/or jam.
To reheat frozen pancakes: Arrange on microwave-safe plate, and cover. Microwave on high about one minute per pancake, rotating at about 30 seconds. Times will vary based on your microwave oven.
Friday, January 11, 2008
Beer = Liquid Bread...
This weekend is shaping up to be an interesting joining of good things!
I will brew Java Coffee Stout on Saturday, and then we will use the steeped grains in a bread following a recipe from Peter Reinhart's Whole Grain Breads.
Part of the beer brewing process is to steep about a pound of crushed grains in warm water (155F/68C) for about 30 minutes. These grains would then normally be discarded (I usually compost them, but some will feed them to the birds), but this time we'll use them as the grains in a whole wheat bread.
The bread will be started tonight with a starter to soak the whole wheat flour. The bread will then be completed tomorrow after brewing the beer and adding the grains and other ingredients.
Wednesday, January 2, 2008
Researching Solar Power for Wisconsin
With energy prices at or near record highs (oil was over $100 per barrel today), we've started considering the possibility of installing some sort of solar system on the house to defray the rising energy costs. However, this is not a simple decision. First of all, it takes significant up-front-investment ($10-$50k it looks like), and there are many different types of systems and options to consider. Plus, there's a host of tax credits and incentives to consider. Then there are zoning issues and restrictive covenants to take into consideration.
I'll try to break down our research in a few blog postings. They will be written as I work my way through the various web sites and find out information.
First, we have a restrictive covenant that would seem to doom the project from the beginning. Renewable energy systems are not allowed in our neighborhood. However, we can appeal to an architectural review committee to be allowed to 'break the rules'. I'm confident that a system that is mounted flush with the roof would be OK. our house's south-facing roof-line faces away from the road, and is quite tall relative to other neighbors, so it should be possible to install a system that is fairly unobtrusive.
So, what type of system are we looking for? We would like a system that
One of the first steps in setting up a system is to assess the site. In Wisconsin, there are certified site assessors charging between $200 and $500 for a full assessment (Focus on Energy will cover 60%, so our cost would be $80-$200). For solar systems, you need a south-facing location with unobstructed view of the sun for as long as possible each day. Fortunately, we have a roof that faces almost directly south, and is high enough that there are very few obstructions once the sun is up. It also seems that Wisconsin gets enough sun - although November/December can be dreary, the highest-demand days are in the summer.
Most of the rest of this is focused on photovoltaics.
Funding Incentives
Perhaps an investment of this magnitude to save the environment is better made in carbon credits? Or maybe more research needed...
I'll try to break down our research in a few blog postings. They will be written as I work my way through the various web sites and find out information.
First, we have a restrictive covenant that would seem to doom the project from the beginning. Renewable energy systems are not allowed in our neighborhood. However, we can appeal to an architectural review committee to be allowed to 'break the rules'. I'm confident that a system that is mounted flush with the roof would be OK. our house's south-facing roof-line faces away from the road, and is quite tall relative to other neighbors, so it should be possible to install a system that is fairly unobtrusive.
So, what type of system are we looking for? We would like a system that
- has a pay-back period of five years or less,
- connects to the grid with net metering,
- can handle 90% of our annual electricity needs (10 kWh),
- can be installed fairly flush with the roof,
- is relatively maintenance-free, and
- works in Wisconsin winters.
One of the first steps in setting up a system is to assess the site. In Wisconsin, there are certified site assessors charging between $200 and $500 for a full assessment (Focus on Energy will cover 60%, so our cost would be $80-$200). For solar systems, you need a south-facing location with unobstructed view of the sun for as long as possible each day. Fortunately, we have a roof that faces almost directly south, and is high enough that there are very few obstructions once the sun is up. It also seems that Wisconsin gets enough sun - although November/December can be dreary, the highest-demand days are in the summer.
Most of the rest of this is focused on photovoltaics.
Funding Incentives
- Focus on Energy: 25% of construction cost up to $35,000 (program expired 12/31/07 - perhaps a new one coming up?)
- Update 1/3/08: Program will continue with the same amounts at least through end of 2008. New forms will be up on web site within a week.
- Federal tax credit: 30% of construction cost up to $2,000 (extended to 12/31/08)
- Net metering - sell any excess energy to the utility. This means all energy is used - no loss to storage in batteries. More sun - better economics.
- Current energy consumption: ~11 kWh /year
- System need: ~7.5 kW panels (6-800 square ft)
- Approximately 4 daily hours of sunshine in Wisconsin (1,460 hours per year).
- A 7.5 kWh system will thus generate 10,950 kWh per year
- Price range: $40,000 - $50,000 (plus installation - it seems possible to most of it as DIY)
- $45,000 after FoE and IRS incentives: $31,750
- One year cost of electricity: ~$1,400
Perhaps an investment of this magnitude to save the environment is better made in carbon credits? Or maybe more research needed...
Subscribe to:
Posts (Atom)
